Battery switch on travel trailer function is crucial for managing your RV’s power. Understanding how to use your battery switch correctly is key to enjoying worry-free adventures. This guide breaks down the different types of switches, how they work, and essential troubleshooting tips, ensuring you’re prepared for anything the road throws your way. We’ll cover everything from basic operation to advanced maintenance, empowering you to become a true RV power pro.
This guide will walk you through the various types of battery switches available for travel trailers, detailing their pros and cons and how to choose the right one for your needs. We’ll also cover safety precautions, troubleshooting common problems, and integrating your battery switch with other systems like solar panels and inverters. Get ready to master your travel trailer’s power system!
Understanding Battery Switch Functionality in Travel Trailers
A battery switch is a crucial component in your travel trailer’s electrical system, allowing you to manage power flow from different sources and protect your batteries. Understanding its function is essential for safe and efficient RV operation. This section will detail the types of switches, their purpose, and how to use them correctly.
Types of Battery Switches
Travel trailers typically utilize one of two main types of battery switches: a simple on/off switch or a more sophisticated multi-position switch. The simple on/off switch is the most basic, connecting or disconnecting your house batteries from the rest of the trailer’s electrical system. Multi-position switches offer more control, often including positions to isolate the batteries completely, connect them to shore power for charging, or connect them to the trailer’s 12V system.
So, you’re gearing up for a road trip in your awesome travel trailer? First things first: understanding your power is key. Check out this guide on the battery switch on travel trailer function to avoid any dead-battery surprises. Knowing how to manage your power is half the battle, and then, don’t forget travel insurance! Securing Aon travel insurance beforehand gives you peace of mind, so you can focus on the open road and not unexpected expenses.
Happy travels!
Some even allow for combining multiple battery banks. Choosing the right type depends on your trailer’s setup and your needs.
Purpose of the Battery Switch
The primary purpose of a battery switch is to control the flow of power between your house batteries and the trailer’s electrical system. This allows you to:
- Prevent battery drain: Isolate your batteries when not using the trailer to avoid draining them completely.
- Manage power sources: Control power flow from shore power (hookups at campsites), a generator, or your house batteries.
- Protect your batteries: Prevent accidental draining of your batteries by the trailer’s systems while disconnected from external power sources.
- Charge batteries efficiently: Ensure batteries are correctly charged by selecting the appropriate switch position.
Operating the Battery Switch: A Step-by-Step Guide
Before operating the switch, ensure you understand the different positions and their functions. Consult your trailer’s owner’s manual for specific instructions. Generally, the process follows these steps:
- Identify the switch positions: Common positions include “Off,” “Battery,” “Both,” and “Shore.” Each position directs power differently.
- Choose the desired position: Select the position based on your power needs and source (e.g., “Battery” to use only battery power, “Shore” to charge batteries from shore power).
- Slowly turn the switch: Avoid jerky movements to prevent damage to the switch or internal components.
- Verify the power flow: After switching, check that power is flowing correctly to your appliances. If you are using battery power, monitor your battery voltage to prevent deep discharge.
Power Flow Diagram
The following describes the power flow with and without the battery switch engaged. Imagine a simple system with shore power, a battery, and a light. Scenario 1: Battery Switch OFFThe battery is completely isolated. No power flows to the light, even if shore power is connected. Scenario 2: Battery Switch ON (Battery Position)Power flows directly from the battery to the light.
Shore power has no impact on the circuit. Scenario 3: Battery Switch ON (Shore Position – Assuming a switch with this capability)Shore power charges the battery. The light is powered by the battery, and the battery receives a charge from shore power. (Note: Specific power flow depends on the switch type and wiring.)
Troubleshooting Common Battery Switch Issues

Your travel trailer’s battery switch is a crucial component, responsible for directing power from your batteries to your trailer’s systems. When it malfunctions, you’ll quickly find yourself without lights, appliances, or even the ability to charge your batteries. Understanding common problems and troubleshooting techniques can save you time, frustration, and potentially costly repairs.
Common Battery Switch Problems, Battery switch on travel trailer function
Several issues can arise with your travel trailer’s battery switch. These range from simple problems like blown fuses or loose connections to more serious issues requiring replacement of the switch itself. No power to your trailer systems is the most obvious symptom, often accompanied by blown fuses or a switch that feels loose or unresponsive. Corrosion at the terminals is another common culprit, hindering the flow of electricity.
Sometimes, the problem might not be immediately obvious and require systematic troubleshooting.
So, you’re prepping for your awesome travel trailer adventure? First things first: understanding your power. Check out this guide on the battery switch on travel trailer function to avoid any dead-battery surprises. Knowing how that works is crucial, and then, don’t forget travel insurance! Getting Aon travel insurance is a smart move for peace of mind on the road, covering unexpected hiccups.
You’ll be set for a smooth trip!
Troubleshooting Steps for Battery Switch Diagnosis
Before replacing your battery switch, thorough troubleshooting is essential. First, visually inspect the switch itself for any signs of damage, corrosion, or loose connections. Check all related wiring for fraying or damage. Then, carefully check the fuses both in the switch and any other fuse boxes in your trailer. A blown fuse will often be visibly damaged (burnt or broken).
If fuses are blown repeatedly, there’s likely a more serious short circuit somewhere in your trailer’s wiring that needs attention. If fuses are intact and connections seem secure, try cleaning the battery terminals and switch contacts with a wire brush and a battery terminal cleaner to ensure a good electrical connection. If the problem persists after these steps, the switch itself is likely faulty and requires replacement.
Battery Switch Replacement Procedure
Replacing a faulty battery switch involves several steps. First, disconnect the negative battery cable from your batteries to prevent accidental shorts. Then, carefully disconnect all wires connected to the battery switch, noting which wire goes where (taking photos can be helpful). Unscrew the switch from its mounting location. Install the new switch in the same location, ensuring it’s securely fastened.
Reconnect the wires, carefully matching them to their original positions. Finally, reconnect the negative battery cable and test the switch functionality. Remember to always refer to your specific trailer’s wiring diagram for precise wire locations and connections.
Tools and Materials Needed for Battery Switch Repair or Replacement
To successfully repair or replace your battery switch, you’ll need the right tools and materials. This includes a battery terminal cleaner, a wire brush, a multimeter (to check voltage and continuity), a screwdriver (appropriate size for your switch mounting screws), wire strippers/cutters (if you need to replace any wiring), replacement fuses (matching the original specifications), and of course, a replacement battery switch (matching your current switch’s specifications).
Safety glasses and gloves are also highly recommended to protect yourself during the repair process. Having a wiring diagram for your specific trailer will be invaluable.
Battery Switch Integration with Other Systems: Battery Switch On Travel Trailer Function
Your travel trailer’s battery switch isn’t an isolated component; it’s a central hub in your electrical system, influencing how power flows from various sources to your appliances and devices. Understanding its interaction with other systems is crucial for safe and efficient RV operation. This section details how the battery switch interacts with common RV electrical systems, including solar panels, inverters, and converters, and explains its role in power distribution under different power sources.
The battery switch acts as a gatekeeper, controlling the flow of power from your house batteries to the rest of your trailer’s electrical system. Depending on the switch’s position, it can connect the batteries to the system, disconnect them completely for safety, or even connect them to a separate charging source. This control is essential for managing power sources and preventing issues like accidental battery drain or short circuits.
Interaction with Solar Panels
Solar panels generate DC power that needs to be stored or used immediately. In most setups, the solar charge controller regulates the charging of your house batteries. The battery switch then determines whether that stored solar power is available to the trailer’s 12V system. With the switch in the “on” position, the stored energy can power lights, fans, and other 12V appliances.
If the switch is “off,” the solar power is still charging the batteries but isn’t available to the trailer’s systems. This ensures the solar panel system functions correctly, preventing potential backfeeding issues.
Interaction with Inverters
Inverters convert 12V DC power from your batteries into 120V AC power, allowing you to run household appliances. The battery switch plays a vital role here. When the switch is “on,” the inverter can draw power from your house batteries to provide AC power. When the switch is “off,” the inverter won’t be able to access the battery power, preventing accidental discharge.
Many modern RVs have inverters that automatically shut off if the battery voltage drops too low, adding another layer of protection.
Interaction with Converters
Converters transform 120V AC shore power or generator power into 12V DC power to charge your house batteries. The battery switch’s position doesn’t directly control the converter’s operation; the converter will charge the batteries regardless of the switch’s setting. However, the switch determines whether the charged power stored in the batteries is accessible to the trailer’s 12V systems. If the switch is “off,” the batteries are charged, but the power remains isolated from the rest of the RV’s electrical system.
Power Distribution in Different Operating Modes
The battery switch significantly influences power distribution depending on your power source:
- Shore Power: With shore power connected, the converter charges your batteries. The battery switch determines if the batteries and shore power supply the 12V system. With the switch “on,” both feed the 12V system; with the switch “off,” only shore power (via the converter) powers the 12V system.
- Generator Power: Similar to shore power, a generator powers the converter, charging your batteries. The battery switch controls whether the charged batteries contribute to the 12V system.
- Battery Power: With the battery switch “on,” your 12V appliances run directly off your house batteries. “Off” isolates the batteries, preventing drain.
Importance of Proper Wiring and Connections
Safe and efficient operation hinges on proper wiring and connections. Incorrect wiring can lead to short circuits, fires, and damage to your electrical components. All connections must be secure and properly insulated. Using appropriately sized wiring for the amperage is critical to prevent overheating and potential fires. It’s highly recommended to have a qualified electrician handle the installation and any complex wiring modifications.
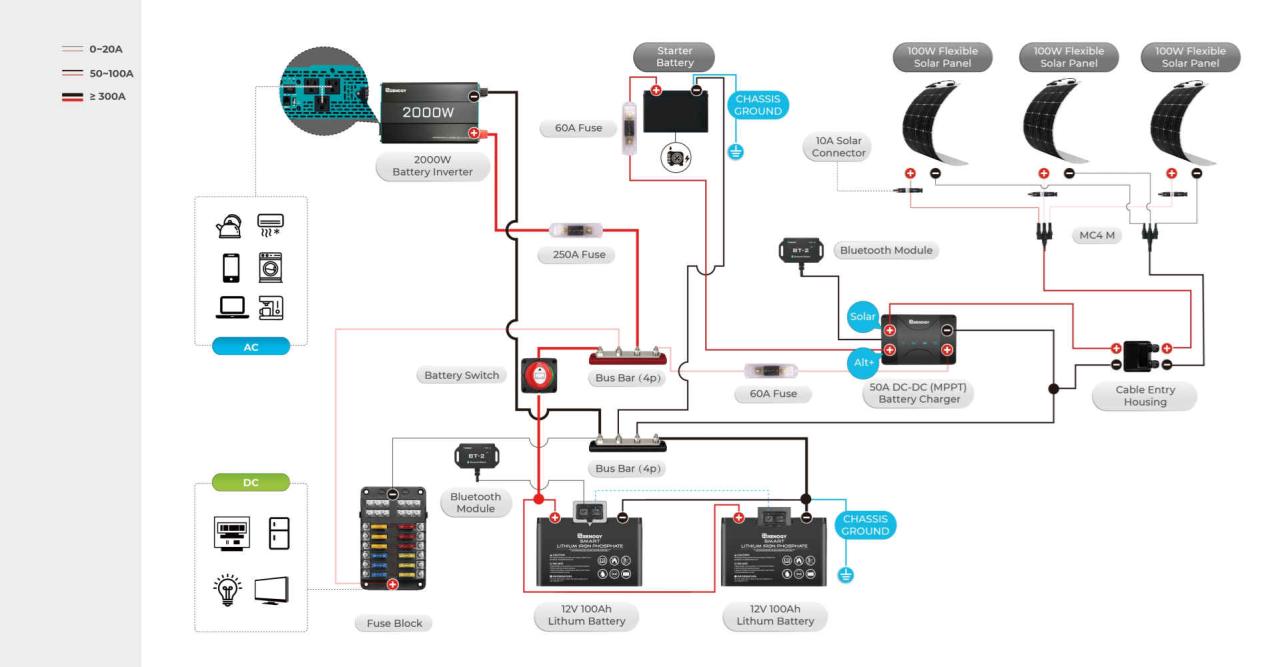
Diagram of Battery Switch Integration
Imagine a diagram. At the center is the battery switch, depicted as a three-position switch (off, battery, both). Three lines emanate from it: one leading to the house batteries, another to the 12V DC system (lights, fans, etc.), and a third to a junction box. This junction box receives power from the converter (shore power/generator input), and the solar charge controller.
Arrows indicate the flow of electricity depending on the switch position. For example, when the switch is in the “battery” position, an arrow points from the batteries to the 12V system. When in the “both” position, arrows point from both the batteries and the junction box to the 12V system. The diagram clearly shows how the switch regulates power flow from different sources.
Mastering your travel trailer’s battery switch is more than just knowing how to flip a switch; it’s about understanding your RV’s power system and ensuring safe and reliable operation. By following the tips and troubleshooting advice in this guide, you’ll be confident in managing your power sources, preventing problems, and extending the life of your battery system. Hit the road with peace of mind, knowing you’ve got your power under control!
General Inquiries
What happens if I leave my battery switch on while plugged into shore power?
Nothing harmful will occur. The switch will simply be redundant in that situation as shore power will be supplying the power.
Can I use a battery switch with solar panels?
Yes, but proper wiring is crucial. Consult a qualified electrician or follow the instructions for your specific solar panel and battery switch system.
How often should I clean my battery switch terminals?
At least once a year, or more frequently if you notice corrosion. Use a wire brush and baking soda solution to clean them.
My battery switch is making a clicking sound. What’s wrong?
This often indicates a faulty switch or a low battery voltage. Check your battery voltage and consider replacing the switch if the problem persists.
